Lesson MINI

Britannica School logo in navy blue and green text

LESSON MINI

The Life Cycle of Bees

Grade:

K-2

Topic:

Animals

Unit:

Life Cycles
Eye icon in white on red background

Overview

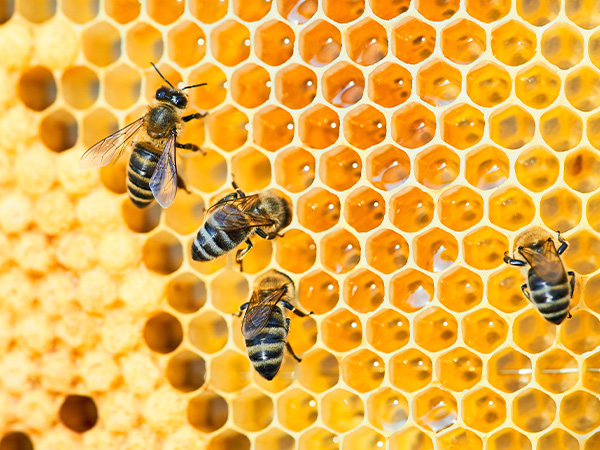
Honeybees working on golden honeycomb, showing hexagonal cell structure.
© Aleksandr Rybalko—iStock/Getty Images

In this lesson mini, students learn about the stages of a bee’s life: egg, larva, pupa, and adult bee. They explore how bees grow and change at each stage, developing relevant vocabulary to describe the stages and the different types of adult bees in hives. Students participate in creative and kinesthetic activities to reinforce these concepts.

Ideas for Implementation
Science
Literacy
Library media
Learning centers
Intervention or enrichment
Interdisciplinary collaboration
Key Vocabulary & Definitions
adult (noun): a fully developed animal or plant
bee (noun): a kind of insect that eats pollen and nectar and sometimes produces honey
cell (noun): a small compartment in a beehive used for storing food and raising baby bees
colony (noun): a big group of bees that live together
drone (noun): an adult male bee who mates with the queen
egg (noun): a small round package made by some kinds of animal that has everything it needs to turn into a new animal
hive (noun): the usually aboveground nest of bees
larva (noun): the second phase of a bee’s life
life cycle (noun): the stages a living thing goes through in its life, from egg or baby to adult
mate (verb): to come together to make babies
pupa (noun): the third phase of a bee’s life
queen bee (noun): an adult female bee who lays eggs and controls the colony
worker bee (noun): an adult female bee who cares for the young, builds the hive, and finds food for the colony
Authentic Learning Extensions
Authentic learning opportunities for studying bee life cycles involve real-world experiences and practical applications that help students understand bee life cycles meaningfully. Here are some examples:
Bee Nursery: Your class can help build a nest for solitary bees using a block of wood with drilled holes, placed outside in full sun facing southeast or south. This hands-on project not only teaches students about bee diversity and habitats but also promotes environmental stewardship and practical skills in a safe, supervised setting.
Bee Survey: Take students to an outdoor garden or flowery area to count bees. Make sure students stay far enough away from the bees to stay safe. You can ask questions like the following: How many bees did you see? / Do you think there is a hive around here? Why or why not? / Why do you think we have so many bees? / Why don’t you think we have many bees here? / How could we help bees feel more welcome here?
Beekeeper Visit: Invite a beekeeper or entomologist to come to your class and talk with students about their job. Before the visit, have students brainstorm a list of questions to ask.
Pollinator Garden: Plant a pollinator garden with students. Make sure to use a seed mix that is attractive to pollinators and native to your area. Tell students that bees find pollen and nectar in these flowers, which they feed to their young.

Choose Activity

3
The Life Cycle of Bees

Activity

1:

Bee Life Cycle

By the end of the activity, students will be able to define key vocabulary related to the life cycle of bees, recite the stages of a bee’s life cycle, and represent it with artwork.

<20

Minutes

Materials

Crayons, markers, and/or pencils (enough for students to share)
Drawing paper (one sheet per student)
Whiteboard or display

Resources

1
Tell students that today they will learn about bees and how they grow. First, they’ll watch a video. Then, they’ll draw a picture to show what they saw and heard. To activate their thinking, consider asking students the following questions to check for comprehension:
How do you think bees start their lives?
How do you think they change as they become adults?
2
Display and play the Bee video. Encourage students to pay special attention to how baby bees grow and change as they become adults.
3
Distribute a piece of paper and crayons, markers, and/or pencils to each student. Follow the procedures outlined in the Draw to Understand instructional strategy, focusing students on the question, “What are the stages of a bee’s life?” Replay the video from 02:04 to 02:46 before having students complete their drawings. As students draw, encourage them to think about how baby bees grow and change into adults. For Step 3 of the strategy, invite a few volunteers to share their drawings with the whole class. Consider asking the following questions, defining key terms as needed:
What did you draw? Why?
Did any of you draw bee eggs? Bee larva? Bee pupa? Adult bees?
How do you think they change as they become adults?
Who lays bee eggs?
What happens after a bee egg becomes a larva?
What do pupa look like?
What kinds of adult bees are there?
4
Affirm students’ answers, clarifying any misconceptions, and then summarize a bee’s life cycle:
a)
Egg: The cycle begins when the queen bee lays an egg.
b)
Larva: The egg hatches into a larva.
c)
Pupa: The larva transforms into a pupa.
e)
Adult: The pupa develops into an adult bee.
Emphasize that adult bees that live together in hives have three distinct roles:
Queen: The queen lays eggs.
Workers: Workers care for the young, build the hive, and collect food.
Drones: Drones mate with the queen to make more bees.
5
To wrap up, summarize that today the class learned about the life cycle of bees—from egg to larva to pupa to adult—by watching a video and drawing what they saw. They discovered that adult bees can be queens, workers, or drones. Ask students this question: Can you remember and name the four stages of a bee’s life cycle?
Graphic Organizers: Provide graphic organizers for students to record their thoughts during the “think” phase. This helps structure their ideas and makes it easier for them to share during the “pair” and “share” phases.
Sentence Starters: Offer sentence starters or prompts to help students begin their discussions. This is particularly useful for students who may struggle with initiating conversation or articulating their thoughts.
Role Rotation: Rotate roles within pairs, such as one student being the “questioner” who asks probing questions and the other being the “responder” who elaborates on their initial thoughts. This helps students develop different communication skills and deepens their understanding of the topic.
Think-Pair-Square: After the initial pair discussion, have each pair join with another pair to form a small group of four. This “square” group then discusses their ideas before sharing with the whole class. This variation promotes a broader exchange of ideas and perspectives.
Digital Think-Pair-Share: Use an online platform where students can type their thoughts during the “think” phase and pair up in virtual breakout rooms to discuss. They can share their final insights with the whole class through a digital forum or collaborative document. This variation leverages technology to facilitate collaboration and sharing.
Team Teaching: For collaborative teaching and learning environments, this learning activity is well suited to a Team Teaching strategy. In this model, both teachers deliver instruction together, often alternating or integrating their teaching styles seamlessly, sometimes referred to as “tag team teaching.” This collaborative approach provides students with multiple perspectives and teaching styles, enriching their learning experience. By modeling effective teamwork and communication, this approach demonstrates how different viewpoints can enhance understanding and create a dynamic and interactive classroom environment. Evidence indicates that team teaching can enhance student engagement and provide a richer, more-diverse educational experience.
Introduction and Bee Video: Teacher A introduces the topic and plays the full video.
Drawing Activity: Teacher B explains the Draw to Understand activity, while Teacher A distributes materials to students. Teacher B replays the part of the video starting at 02:04. As students draw, both Teacher A and Teacher B visit with students to provide individualized support.
Sharing and Debrief: Teacher A calls on volunteers to share their work, and Teacher B asks the discussion questions. Teacher A models possible answers, if needed. Teacher B summarizes the four stages of a bee’s life cycle, and Teacher A summarizes the roles of bees that live in hives.
The Life Cycle of Bees

Activity

2:

Build a Hive

By the end of the activity, students will be able to sequence and summarize the stages of a bee’s life cycle.

>40

Minutes

Materials

Bee images
Bee life cycle image
Close-up beehive image
Crayons or markers (enough for students to share)
Glue sticks (one per student)
Toilet paper tubes (one per student)
Paper clips (three per student)
Scissors (one per student)
Whiteboard or display

Resources

1
Prior to beginning the activity, prepare the craft for students as shown in the Beehive Model Preparation and Instructions.
2
Share with students that today they will learn about bees and how they grow.
3
Show bee images selected from ImageQuest Jr., Britannica School, or another royalty-free source to activate thinking, encouraging students to make observations about the images.
4
Review the K-W-L instructional strategy and graphic organizer. Display the K-W-L graphic organizer within the strategy and guide students to share first what they know and then what they want to know about bees, scribing their responses to fill out the K and W sections of the organizer. Encourage students to reference the displayed images as they discuss what they know and what they want to know about bees.
5
Tell or remind students that some kinds of bees live in homes called hives. Show a close-up image of a beehive from a royalty-free source. You should be able to see the cells of the hive. Ask:
What do you notice about this hive?
The little containers you see are called cells. What do you think is in the cells?
What do you think the bees climbing on the cells are doing?
6
Emphasize that hives are made up of many six-sided cells. Tell students that today, they will create their own hive model and learn more about what happens there.
7
Give each student a glue stick, four prepared pieces of toilet paper tube, and three paper clips. Read Part 1 of the Beehive Model Preparation and Instructions aloud and guide students to begin creating their hives.
8
Tell students that next, they’ll watch a video about how bees use their hives. Encourage students to pay attention to how bees grow from eggs to adults. Play the Bee video starting at 2:04. Consider asking the following questions:
What jobs can a bee have?
Which bee lays the eggs?
Which bees care for the young bees?
What are the stages of a bee’s life?
When do young bees leave their cells?
9
Display a bee life cycle image from a royalty-free source. Summarize the life cycle of bees, emphasizing that some cells in a hive are used to protect young bees as they grow:
First, queen bees lay the eggs.
The eggs grow into larva, then pupa, then adults.
Worker bees care for the young bees as they grow.
When the young bees become adults, they leave their cells.
Different adults have different jobs, but all the jobs involve making or caring for young bees. When an adult bee lays more eggs, the life cycle starts over!
10
Give each student a Bee Stages handout and a pair of scissors. Read Part 2 of the Beehive Model Preparation and Instructions aloud and guide students to continue creating their hives.
11
Have students work with a partner to put the pictures in order from youngest bee to oldest bee. When students are finished, discuss their answers as a class. You might ask the following questions:
Which picture did you put first? next?
How are larvae different from eggs?
How are larvae different from adults?
12
Tell students that adding the different stages of bees is the last step in creating their hives. Give student crayons or markers and glue. Read Part 3 of the Beehive Model Preparation and Instructions aloud and guide them to finish their hives.
13
Congratulate students on their hives. Remind students that one hive might have many young bees in different stages of development. Have students put their hives together so that they make one big hive. If desired, you can glue all of the hives together and hang them in your classroom.
14
Review the bee life cycle, pointing to appropriate cells as you summarize: The queen bee lays the eggs. The eggs hatch into larvae, which grow and then change into pupae, which finally become adults. Worker bees care for the young bees as they grow. When young bees become adults, they can fly and leave the hive. They begin doing their jobs, including making and caring for the new babies. One day, some of those babies will grow up and care for new babies, too!
15
As a class, complete the L portion of the K-W-L graphic organizer and circle anything you didn’t cover from the W section. Make sure to address these items as your class continues to explore bees.
Unlabeled Handouts: Consider using an unlabeled Bee Stages handout. After students have cut out the pictures, have them work with a partner to label each picture with a phase of the bee life cycle before gluing it to their hive. This gives students the opportunity to practice their observation skills and apply their new knowledge of the bee life cycle.
Prepare the Craft: If your students need more time to discuss and make sense of bee life cycles, pre-complete some of the craft for them. For example, you might pre-cut the pictures for each student and/or pre-glue the cells together for each student.
Picture Sorting: For a quicker version of the activity, print one unlabeled handout for each pair of students. Cut out the hexagon-shaped pictures on these handouts in advance. After showing the bee video to the class, give each pair of students one complete set of these picture cards. Instruct the pairs to arrange the pictures of the bee life cycle in the correct order and label each stage. Once they’ve finished, conduct a whole-class review. During this debrief, discuss each image in turn, reinforcing the stages of the bee life cycle. This streamlined approach allows students to complete the core learning activity in less time while still effectively reinforcing the key concepts.
Parallel Teaching: For collaborative teaching and learning environments, this learning activity is well suited to a Parallel Teaching strategy. In this model, the class is divided into two groups, and each teacher delivers the same activity simultaneously to their group. This reduces the student-teacher ratio, allowing for more interaction and individualized attention. With smaller groups, students are more likely to participate actively and receive immediate feedback, which fosters a deeper understanding of the content and promotes a more-engaging learning experience. Evidence suggests that small-group instruction leads to increased student engagement and improved academic outcomes.
Introduction and Beehive Video: Each teacher facilitates the K-W-L activity for their group and then shows the Beehive video and discusses how bees use their hives.
Hive Construction: Each teacher supports students in their group as they build their hives. After giving instructions, and as students are gluing their hives, teachers might ask the following questions: How is your hive similar to a real beehive? / How is it different? / What do you think bees put in these cells?
Bee Video: Each teacher plays the Bee video for their group and debriefs with the discussion questions.
Bee Stages: Each teacher supports students in their respective groups as they add the bee pictures to their hives.
Conclusion: Teachers and groups come back together to display and combine their hives and review the bee life cycle as a class.
The Life Cycle of Bees

Activity

3:

Baby Bumblebees

By the end of the activity, students will be able to recite and represent the stages of a bee’s life cycle and describe the different types of bees that live in hives.

<20

Minutes

Materials

Bee life cycle image
Drone bee image
Queen bee image
Whiteboard and display
Worker bee image

Resources

1
Tell students that they will learn about bees and how they grow today. First, they’ll watch a video about bees. Then, they’ll learn a song about them.
2
Play the Bee video starting at 2:04. Encourage students to pay attention to how bees grow from eggs to adults. Consider asking the following guiding questions to activate thinking:
What are some different kinds of adult bees?
What are some stages bees go through to become an adult?
How do baby bees change as they grow?
Who do you think lays the eggs?
3
Show a bee life cycle image selected from ImageQuest Jr., Britannica School, or another royalty-free source. Share with students that the queen bee lays most of the eggs. Then, describe the bee life cycle step by step. When you have finished describing how a baby bee becomes an adult, point out that the queen adults go on to lay most of the eggs, and the cycle starts over.
4
Have students stand in an area where they have room to move. Tell students that now they’ll learn a song and act like growing bees. Once they’re all done growing, they’ll find out what kind of bee they are: queen, worker, or drone!
5
Display the Baby Bumblebee lyrics and sing the song to the tune of “Bringing Home a Baby Bumblebee.” Have students do the following movements for each verse:
Egg: crouch on the floor like an egg
Larva: stretch out a little, wriggling like a larva
Pupa: stretch out a little and be very still, as if they grew into a pupa
Adult: jump with their arms and legs stretched out and back like a bee’s wings
6
During the last verse, display a picture of the queen and have students shout “queen!” to finish the song. Tell students that queen bees
are in charge of the other bees in the colony;
are female;
tell the other bees what to do; and
lay a lot of eggs.
7
Sing the song two more times, highlighting worker bees and drone bees. After singing, tell students about each kind of bee.
Worker bees are female/ build hives / take care of the young / and find food for the colony.
Drone bees are male / fly fast and have big eyes / and help make baby bees.
8
Review bee life cycles and types with students by asking questions such as the following:
Where do baby bees live? Who put them there?
How do bees change and grow from egg to adult?
What happens after a bee becomes an adult?
What is something you know about queen bees? Worker bees? Drones?
9
Praise students for their singing. Use any available moments to practice the song with the class throughout the day, reinforcing their learning.
I Do, We Do: Sing the song and do the movements once without expecting students to join in. Then, sing the song again and encourage students to join. After each verse, tell students which stage of development comes next (e.g., “Next, we’ll act like larva! You can stretch out just a little bit for this part.”). This helps students know what to expect and prepare to join in.
Add a Movement: When you reveal that students have become a queen, worker, or drone bee at the end of the song, encourage them to share what they know about that kind of bee. Invite them to think of movements they could do to show that kind of bee. This allows them to share knowledge about adult bees and represent it creatively.
Bee Charades: Tell students that there are often many bees in different stages of development in the same hive. Invite 3-5 volunteers to the front of the class. Have each volunteer pretend like they are an egg, a larva, a pupa, or an adult. Then, ask the remaining students to describe the bees, prompting them with the following questions:
Which of these bees are the youngest? How do you know?
What are those bees called?
Do you see any pupae? What will they become next?
For an extra challenge, have the volunteers grow into their next phase. This activity gives students the opportunity to exercise their understanding of bee life cycles from multiple points of view.
Team Teaching: For collaborative teaching and learning environments, this learning activity is well suited to a Team Teaching strategy. In this model, both teachers deliver instruction together, often alternating or integrating their teaching styles seamlessly, sometimes referred to as “tag team teaching.” This collaborative approach provides students with multiple perspectives and teaching styles, enriching their learning experience. By modeling effective teamwork and communication, this approach demonstrates how different viewpoints can enhance understanding and create a dynamic and interactive classroom environment. Evidence indicates that team teaching can enhance student engagement and provide a richer, more-diverse educational experience.
Bee Video and Discussion: Teacher A introduces the Bee video and encourages students to pay attention to how bees change and grow from eggs to adults. After the video, Teacher B asks students questions as Teacher A listens and affirms ideas.
Review of Bee Life Cycle: Teacher A displays the bee life cycle image and reviews the bee life cycle. Teacher B listens and points to the appropriate stage on the diagram.
Song: Both teachers model singing the song. As they sing the first version of the song, Teacher A does the motions and Teacher B points to the lyrics and displays the appropriate queen, worker, or drone image. Teachers switch roles for subsequent versions of the song.
Activity Wrap-Up: Teacher A asks the wrap-up questions. Teacher B listens and affirms students’ ideas.
© Encyclopædia Britannica, Inc. All rights reserved.