Lesson MINI

Britannica School logo in navy blue and green text

LESSON MINI

The Life Cycle of Butterflies

Grade:

K-2

Topic:

Animals

Unit:

Life Cycles
Eye icon in white on red background

Overview

Monarch butterflies emerging from chrysalises, showing stages of metamorphosis on tree branch.
© CathyKeifer—iStock/Getty Images

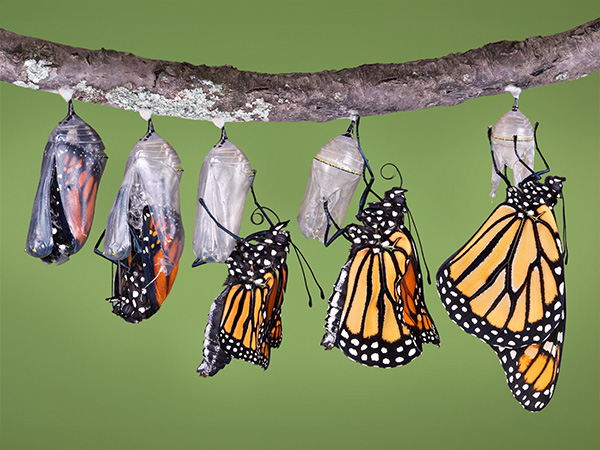
In this lesson mini, students learn about the stages of a butterfly’s life: egg, caterpillar, pupa, and adult. They explore how butterflies grow and change at each stage, developing relevant vocabulary to describe the stages and the traits of caterpillars and adult butterflies. Students participate in creative and kinesthetic activities to reinforce these concepts.

Ideas for Implementation
Science
Literacy
Library media
Learning centers
Intervention or enrichment
Interdisciplinary collaboration
Key Vocabulary & Definitions
adult (noun): a fully developed animal or plant
antennae (noun): the long, thin parts on an insect’s head that help it feel and smell things; also called feelers
caterpillar (noun): a small wormlike insect that grows and changes into a butterfly or moth; the larva of a butterfly or moth
chrysalis (noun): the pupa of a butterfly, or the hard outer layer that protects a pupa as it is turning into an adult
egg (noun): an often round or oval package that is the first stage of most insects’ lives and from which the young hatch
insect (noun): a small animal, sometimes called a bug, with six legs and three body parts that usually has wings, such as a butterfly or a bee
larva (noun): a young, wingless, often wormlike form of a winged insect
molt (verb): to shed, or lose, a covering of skin, hair, feathers, etc., and replace it with new growth
nectar (noun): a sweet liquid produced by flowers
proboscis (noun): a long straw-like body part that can be curled up or uncurled that serves as a butterfly’s mouth
pupa (noun): a stage of a butterfly’s or moth’s life when it is still and enclosed in a protective covering as it changes from a caterpillar into an adult
trait (noun): a quality or characteristic that makes something special, such as its body parts, color, shape, behavior, or size
Authentic Learning Extensions
Authentic learning opportunities for studying the life cycle of butterflies involve real-world experiences and practical applications that help students understand the different stages meaningfully. Here are some examples:
Butterfly Life Cycle in Observation: If school regulations permit it, offer students the chance to observe the butterfly life cycle in action. Provide a habitat with appropriate conditions for the insect. Invite students to observe the egg hatch into a caterpillar, transform into a pupa, and finally become a butterfly.
Butterfly Garden: Arrange a visit to a butterfly garden at a local science museum, botanical garden, or nature center. Alternatively, with approval, plant a butterfly garden to attract butterflies that students can observe.
Library Visit: Encourage students to visit their local libraries with their guardians and find fiction and nonfiction texts about butterflies. This promotes a home-to-school connection.
Nature Walk: Go on a nature walk to observe caterpillars and butterflies in their natural environments. Invite students to use their knowledge from the text to describe caterpillars and butterflies effectively. Ask students to record their observations on a sketch pad that each has brought along on the walk. This activity encourages students’ curiosity about their surroundings and helps them develop their observational skills.

Choose Activity

3
The Life Cycle of Butterflies

Activity

1:

Cool Caterpillars

By the end of the activity, students will be able to describe caterpillar traits and use appropriate vocabulary to describe a caterpillar’s life.

>40

Minutes

Materials

Black markers (one per student)
Caterpillar images
Crayons and/or markers, and writing utensils
Dot stickers (.25-inch diameter, preferably white, two per student)
Glue or glue sticks (one per student)
Jumbo craft sticks (one per student)
Paper bags (lunch-size, one per student)
Pipe cleaners (one per student)
Pom-poms (small, 12–13 per student)
Precut 3-inch pieces of pipe cleaner (black or brown, three per student)
Pre-made caterpillar craft (for teacher’s demonstration)
Whiteboard or display

Resources

1
Tell students that today they will learn about caterpillar traits by reading an article, exploring new words, and making a caterpillar craft.
2
Display several images of caterpillars from ImageQuest, Britannica School Jr. or another royalty-free source, and ask students to describe what they see. Use guiding questions to drive discussion:
What do caterpillars look like?
How do you think they move?
What do they eat?
Where do they live?
3
Display the Caterpillar article, and ask students to predict what they will learn about in the article based on the title, subheadings, and images on the page. As students make predictions, scribe their responses on the board.
4
Before the reading, write the following key words on the board: caterpillar, chrysalis, molt, and pupa. Tell students that they should look for these words in the reading. Read the Caterpillar article aloud to the whole class. While reading, pause for comprehension checks at the end of each section, asking questions like the ones below. Focus the discussion on butterfly caterpillars.
What are caterpillars?
What do caterpillars look like?
How many eyes do they have?
What colors are caterpillars?
What is molting?
How many times does a caterpillar molt?
What comes before and after the caterpillar stage?
What is a pupa? What does it do?
5
Use the Draw It, Write It instructional strategy to have students draw pictures and write sentences on index cards for the key words on the board. Display their completed pictures to create a Word Wall.
6
Invite students to complete a hands-on caterpillar craft to reinforce what they have learned from the article. Begin by showing students a finished craft, and then demonstrate the steps they need to take to complete it:
a)
Use the black marker to draw six tiny eyes on each of the dot stickers.
b)
Glue the dot-sticker eyes to opposite sides of a pom-pom that will serve as the caterpillar’s head.
c)
Glue the head pom-pom to one end of the craft stick.
d)
Glue the remaining pom-poms to the stick, squishing them as close together as necessary to fit them all on.
e)
Glue the pipe-cleaner legs to the bottom of the craft stick, beneath each of the first three pom-poms behind the head. Make sure that the pipe cleaners stick out evenly on both sides.
f)
Bend the edges of the pipe cleaners into legs.
7
After modeling the directions, provide students with the materials needed to create their own caterpillars. Each student should receive the following:
Dot stickers (.25-inch diameter, preferably white, two per student)
Glue or glue sticks (one per student)
Jumbo craft sticks (one per student)
Pom-poms (small, 12–13 per student)
Precut 3-inch pieces of pipe cleaner (black or brown, three per student)
8
After the caterpillars are completed and dry, hand out the lunch-size paper bags, and tell students to place their caterpillars inside. The bags are like a butterfly’s chrysalis. Have students glue the paper bags closed.
9
Display an image of a cocoon. Review that it is the hard outer layer that protects a pupa as it is turning into an adult. Consider punching a hole in the paper bags, threading a string through them, and hanging them as chrysalises around the classroom.
10
To wrap up the activity, invite students to pretend they are now flying butterflies that have broken out from their cocoons.
Small Groups: Separate students into small groups and assign each group a word. Invite each student to draw a picture of their group’s word and use it to write a sentence. This allows students to build on one another’s ideas and co-construct their understanding of the word.
Group Sentences: Invite students to draw a picture of their word. Then, as a class, construct a sentence using each word. Ask students to write the sentence the class constructs for their word on their handout. This allows students to understand how other students are thinking about the new words and collaborate with them to create sentences.
Word Connections: After students have finished writing and drawing, hang their work on the whiteboard, grouping work that represents the same vocabulary word together. Then guide students to identify how the words connect. Draw lines between the words and note their relationship, using words and phrases like “the same,” “opposite,” and “example.” This allows students to think about how the vocabulary words are related.
Labeled Illustrations: After students complete their drawings, encourage them to add detailed labels to different parts of their illustrations. For example, in a drawing of a habitat, they might label “mountains,” “grass,” or “water source.” This labeling process helps students break down complex concepts into identifiable components. It also reinforces related vocabulary and encourages more precise observation skills. When students share their work, ask them to explain their labels, promoting verbal articulation of their understanding. This additional step enhances vocabulary retention, improves descriptive language skills, and deepens comprehension of the main concept by connecting it to supporting details.
Vocabulary Story: Instead of asking students to craft individual sentences, work with the whole class to write a short story or informational text that incorporates multiple new vocabulary words. This allows students to experiment with how the words are related and how they might be used together in context.
Interactive Word Wall: Create an interactive word wall by displaying students’ work. Encourage ongoing engagement by adding new words and illustrations throughout the year. Periodically review and discuss the words as a class. Use the wall as a reference during other activities or writing activities. Invite students to add sticky notes with new sentences or examples they encounter using these words. This approach transforms the word wall into a dynamic, evolving learning tool that supports continuous vocabulary development and
Parallel Teaching: For collaborative teaching and learning environments, this learning activity is well suited to a Parallel Teaching strategy. In this model, the class is divided into two groups, and each teacher delivers the same activity simultaneously to their group. This reduces the student-teacher ratio, allowing for more interaction and individualized attention. With smaller groups, students are more likely to participate actively and receive immediate feedback, which fosters a deeper understanding of the content and promotes a more engaging learning experience. Evidence suggests that small-group instruction leads to increased student engagement and improved academic outcomes.
Activity Introduction: Each teacher introduces different caterpillar images and then reads the Caterpillar article with their group, guiding and enriching the discussion and checking for comprehension.
Vocabulary Practice: Each teacher leads their group in creating a Word Wall to practice key vocabulary found in the text.
Caterpillar Craft: Each teacher supports their students in creating a caterpillar out of different-colored pom-poms and placing their finished crafts in the chrysalis-model paper bag.
Activity Wrap-Up: Both teachers work together to review key concepts from the activity and guide students to fly around like butterflies.
The Life Cycle of Butterflies

Activity

2:

How Butterflies Grow and Change

By the end of the activity, students will be able to describe and sequence the different stages of a butterfly’s life cycle.

30-40

Minutes

Materials

Glue (one per student)
Images of a butterfly egg, caterpillar, pupa, and adult
Markers and writing utensils
Paper (one per student)
Scissors (one per student)
Whiteboard or display

Resources

1
Begin the activity by asking students to reflect on how humans change in their lifetimes. Ask the following guiding questions:
How do babies change as they become kids?
How do kids change as they become adults?
How do adults change as they grow older?
Can you describe your grandparents or an older person?
2
Share with students that humans change a lot in their lifetimes, and butterflies also change, but in very different ways. Prompt a discussion on what baby butterflies are like and how they grow into adult butterflies, using the guiding questions below:
What are baby butterflies like?
How do baby butterflies happen?
How do they grow into adult butterflies?
3
Tell students that today they will be learning about a butterfly’s life cycle by watching a video and reading an article. They will practice using words that tell how a butterfly grows and transforms at each stage of its life cycle.
4
Invite students to watch the Butterflies video. As they watch the video, ask them to pay attention to butterfly traits and behaviors, especially their life cycles (shown starting at 2:16). Review with students that a trait is a quality or characteristic that makes something special, such as its body parts, color, shape, behavior, or size.
5
After the video, engage students in a whole-class discussion, asking students the following guiding questions:
What do butterflies look like?
What do they eat?
When are they most active?
Do butterflies like cold weather?
What are the four stages of the butterfly life cycle?
6
As students share their answers, scribe their responses in a Bubble Web graphic organizer.
7
Ask students to complete a Butterfly Life Cycle handout independently to practice spelling and sequencing the four stages of a butterfly’s development. Then, discuss the answers with the whole class.
8
Display images of a butterfly egg, caterpillar, pupa, and adult from ImageQuest Jr., Britannica School, or another royalty-free source. Ask students to look at the images and describe what they see. Use guiding questions such as the following:
What shape are the butterfly eggs? What color are they? Are they separate or together? Where are they—on the ground, or somewhere else? How can you tell?
What color is the caterpillar? Does it have a pattern? What is it doing? Is it fuzzy, or not?
What does the pupa look like? Is it see-through, or not? Do you think a butterfly will come out soon, or not? Why?
What color is the adult butterfly? Does it have a pattern on its wings? What is it doing? Can you name any parts of the butterfly?
9
To conclude the activity, lead students in a Total Physical Response activity. Ask them to act out the following:
a)
Curl up small like a butterfly egg.
b)
Crawl slowly like a caterpillar.
c)
Stay motionless like a pupa.
d)
Spread their arms and flutter like a butterfly.
10
Invite students to reflect on their learning by summarizing and sharing as a class how butterflies grow and change at each stage.
Sequencing Stages: For students who are not yet ready to use scissors, precut the images for the Butterfly Life Cycle handout. Consider adding a letter pool from which students can choose to fill in the blanks in the words. This supports students who need more support with fine motor skills as well as emergent readers.
Butterfly Stories: Invite students to work in pairs and write a paragraph summarizing the main ideas from the video and describing butterflies. This fosters students’ independent writing and collaborative skills.
Charades: Instead of the Total Physical Response activity, conclude the activity by playing a game of charades and act out different words that students have to guess, such as egg, caterpillar, butterfly, crawl, and fly. This game-based activity builds classroom community.
Team Teaching: For collaborative teaching and learning environments, this learning activity is well suited to a Team Teaching strategy. In this model, both teachers deliver instruction together, often alternating or integrating their teaching styles seamlessly, sometimes referred to as “tag team teaching.” This collaborative approach provides students with multiple perspectives and teaching styles, enriching their learning experience. By modeling effective teamwork and communication, this approach demonstrates how different viewpoints can enhance understanding, inspire higher-level thinking, and create a dynamic and interactive classroom environment. Evidence indicates that team teaching can enhance student engagement and provide a richer, more diverse educational experience.
Activity Introduction: Teacher A leads the reflection on how humans change in their lifetimes, asking the guiding questions about babies, kids, adults, and grandparents. Teacher B transitions to discussing butterfly changes and prompts the discussion on baby butterflies and their growth.
Video and Discussion: Teacher A introduces the Butterflies video and instructs students to pay attention to butterfly traits and behaviors. After the video, Teacher B leads the whole-class discussion using the provided guiding questions, while Teacher A scribes responses in a bubble web graphic organizer.
Independent Work: Teacher A distributes the Butterfly Life Cycle handout and explains the task. Teacher B circulates to support students. Both teachers then discuss the answers with the whole class.
Image Analysis: Teacher A displays the images of butterfly life stages. Both teachers take turns asking the guiding questions about each image, encouraging students to describe what they see.
Total Physical Response Activity: Teacher B leads the movement activity, instructing students to act out each stage of the butterfly life cycle. Teacher A demonstrates the movements alongside the students.
Activity Wrap-Up: Both teachers guide the final reflection, inviting students to summarize how butterflies grow and change at each stage. They provide assistance and affirmation as needed.
The Life Cycle of Butterflies

Activity

3:

Beautiful Butterflies

By the end of the activity, students will be able to describe adult butterflies’ traits using appropriate vocabulary.

>40

Minutes

Materials

Butterfly images
Colored pencils, crayons, and/or markers
Index cards or sticky notes (for interactive Word Wall)
Paint for craft activity
Paintbrushes (one per color, per student)
Whiteboard or display

Resources

1
Begin the activity by sharing that today students will learn about butterfly traits and create a beautiful butterfly picture.
2
Use the Guided Image Observation instructional strategy. Display several images of butterflies from the Butterfly article, ImageQuest Jr., Britannica School, or another royalty-free source, and ask students to describe what they see. Use guiding questions to drive discussion:
What do you notice about these butterflies?
How are the butterflies you see alike? How are they different?
What are the butterflies doing in the pictures?
What do you think are some things adult butterflies need to do to survive?
How are adult butterflies different from eggs and caterpillars?
What physical traits of adult butterflies do you see?
Based on the pictures, where do you think butterflies live?
3
Display the Butterfly article, and read it aloud to the whole class. At the end of each section, pause for a comprehension check, asking the following questions:
What kind of animal is a butterfly?
What body parts do butterflies have?
What do butterflies’ wings look like? How many legs do they have?
What can butterfly feet do?
What do butterflies use their antennae for?
When and how do butterflies rest?
What do butterflies have for food? How do they eat it?
What are the stages of a butterfly’s life?
What do caterpillars eat?
What is a pupa?
As students answer the questions, focus on key words in the article, such as insect, proboscis, nectar, caterpillar, pupa, and antennae. Write the words on index cards or sticky notes to display on an interactive Word Wall.
4
Show students an image of a butterfly, one that clearly shows the symmetry of the butterfly’s wings. (The buckeye butterfly image in the Butterfly article might be a good choice.) Share with students that butterfly wings are generally symmetrical, meaning that they look the same on both sides.
5
Tell students they will be painting or coloring a symmetrical butterfly. Model how to do this by demonstrating the steps needed to complete the craft:
a)
First, fold a copy of the Butterfly Symmetry handout in half along the dotted line, and then reopen it.
b)
Then, paint one butterfly wing, using a variety of colors to make some different shapes and patterns. Demonstrate how to not use too much paint and how to keep the paint more in the center of the wing than in the middle or at the edge.
c)
Refold the paper in half along the dotted line, pressing down to ensure that the paint transfers evenly to the other side.
d)
Finally, open the paper to reveal the beautiful symmetrical butterfly.
6
Provide students with the materials needed to complete their craft: different colors of paint, paintbrushes, and the Butterfly Symmetry handout. As students complete the project, circulate among them, providing assistance and encouragement.
7
As the students’ butterflies dry, tell students to name their butterflies. Have them work in pairs to invent a butterfly dialogue that demonstrates some of the butterfly traits they learned about. Model how to do this by reading aloud the following dialogue, perhaps showing two completed butterflies “talking” to each other:
Butterfly A: How are you today?
Butterfly B: I’m fine, but I’m a little bit cold because I don’t like the winter.
Butterfly A: Should we migrate somewhere else?
Butterfly B: I heard that the weather is always nice in California!
Butterfly A: Let’s go!
Butterfly B: Okay, but let me just smell the flowers with my antennae first.
Butterfly A: Great, I will drink the nectar from the flowers because I’m hungry.
Butterfly B: Me, too!
8
After students have created their dialogues, allow them time to play them out with their partners, using their dried butterflies. Ask volunteers to showcase their butterflies and dialogues to the whole class.
9
Review key vocabulary from the activity, using words displayed on the interactive Word Wall. Reflect on the activity learnings and invite students to share what they learned about butterflies.
10
Finish the activity by inviting students to play an adapted version of Duck, Duck, Goose called Caterpillar, Caterpillar, Butterfly. Ask students to sit in a circle, and invite a volunteer to tap them on their heads, saying “Caterpillar, caterpillar…” until finally calling on the “butterfly,” who has to fly around and chase the caterpillar.
Butterfly Craft: Provide students extra support with their fine motor skills by helping them fold their papers to create their symmetrical butterflies. For students with more advanced motor skills, consider having them cut out their finished butterflies and glue them to craft sticks to use as puppets in their butterfly dialogues.
Structured Observation: Provide students with a structured observation sheet that includes prompts or checklists for specific details to look for in the image, such as people, objects, settings, colors, and symbols. This support helps students focus their attention on key elements of the image and provides a clear framework for their observations, making the activity more accessible and ensuring that all students can participate effectively.
Butterfly Dialogues in Writing: Consider encouraging students to write down their dialogues as scripts to practice their independent writing skills. This allows students to practice group work and enhance their writing skills.
Depth of Observation: After students share their initial observations, challenge them to identify and discuss any details in the image that may suggest deeper meanings or themes related to the curriculum or broader concepts. This scaffold promotes critical thinking by prompting students to move beyond surface-level observations and consider the significance of visual elements within the context of their learning. It encourages them to analyze and interpret the image’s implications, fostering a deeper understanding of both the visual content and its connections to broader ideas or themes in their studies.
Butterfly Coloring: On the Butterfly Symmetry handout, give students the option of coloring with colored pencils, crayons, and/or markers. Encourage them to color the wings symmetrically, which gives them the opportunity to practice the concept of symmetry.
Parallel Teaching: For collaborative teaching and learning environments, this learning activity is well suited to a Parallel Teaching strategy. In this model, the class is divided into two groups, and each teacher delivers the same activity simultaneously to their group. This reduces the student-teacher ratio, allowing for more interaction and individualized attention. With smaller groups, students are more likely to participate actively and receive immediate feedback, which fosters a deeper understanding of the content and promotes a more engaging learning experience. Evidence suggests that small-group instruction increases student engagement and improves academic outcomes.
Activity Introduction: Each teacher introduces different butterfly images to their respective groups, asking guiding questions to encourage analysis.
Reading: Each teacher reads the Butterfly article with their group, guiding and enriching the discussion, checking for comprehension, and adding key words to an interactive Word Wall.
Butterfly Craft: Each teacher demonstrates the making of the craft project to their group and supports their students in painting a butterfly, paying special attention to helping students fold their papers correctly so that the butterflies look symmetrical.
Butterfly Dialogues: Each teacher models a dialogue, integrating key ideas from the text, and then pairs up their students so that they can work on their dialogues.
Activity Wrap-Up: Both teachers review key vocabulary and concepts with their respective groups and then invite students to play Caterpillar, Caterpillar, Butterfly.
© Encyclopædia Britannica, Inc. All rights reserved.